"Celebrate the tiny victories."
But this my friends is a little bigger than 'tiny.' I am so excited to have it all done because wow was I close to a meltdown, literally (it was hotter than heck) + mentally (lots of leveling).
In true me fashion, I didn't get a great picture of all of the supplies used together, but you get the picture with the list, I hope. Something to note, you can use lots of different types of exterior wood for this project. I opted for decking because it was what I had in my garage, the width worked for the size I was going for, + it was not treated lumber, meaning that the chemicals used to treat the wood will not get into the soil + contaminate my fruits + veggies. WIN-WIN-WIN
I know ya'll realllllly only care about the details of this project, so let's put the DO IT, in DIY ;)
(I linked all the items I could for you and they're close to identical to what I used)
Supplies Needed:
-pencil
-measuring tape
-(6) 1x4 decking board (can't find a link for it)
-patience
-shovel
-herbs, fruit, veggies to fill your garden
First things first, clean up the area you're wanting to place your garden + measure said spot, so you can determine the proper measurements for cutting your wood. I was back and forth between a few different sizes before ending up at 3 ft x 5 ft. After figuring out the best place for your garden bed, you can either go cut/measure the wood, start on the exciting part (which is what I did) or you can start leveling out the ground-if it isn't already. That's where the patience on the supplies list comes to play. Before I start having nightmares about leveling let's move on...
Second things second, start measuring. Get the decking and the 2x4 so you can begin to measure + cut. Mark 5 feet on each piece, cut there, sand the rough edges, making sure each piece is the same length. I went with 3 feet by 5 feet, it was an easy cut for the wood because each piece was 8 feet long, so cutting one piece to five feet ensured the leftover piece from that cut was 3 feet, easy peasy! Did that six times + BAM, first cuts were complete. Measure the 2x4 to 16 inches + cut 6 of those as well.
Note: If you do a different height than I did for your beds, just make sure the 2x4 measurement is at least 4 inches taller than the height of your bed, you'll be sticking that part of the wood into the ground for extra secure-ness (idk if that's a word).

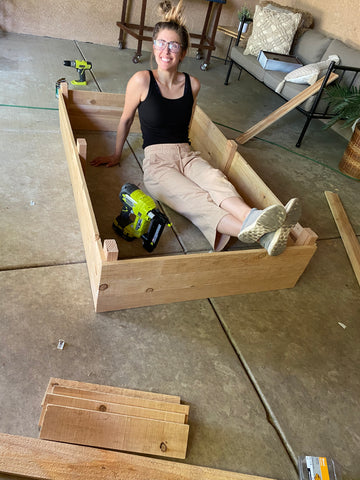
Third things third, assembly! Grab your drill, wood screws, + wood you just cut to start putting this baby together. Place the decking in a straight even line on the 2x4's (3 of them; two on the ends, one in the center) + drill pilot holes (trust me, this makes life much easier) + screw the wood pieces together, ensuring there aren't any gaps or spaces between each wood panel. Remember, there will be 4 inches of the wood posts sticking out on one end of this competed look (make sure they're all on the same side!!!!).

Once the two long pieces are constructed, it's time to add the side pieces. I opted to use a nail gun here because my arms were tired from holding the drill + wood for so long haha. You can still use a drill here if you don't have access to a nail gun! Make sure there are no or minimal gapping between each piece of wood as you assemble.

Fourth things fourth, lay in your bed + think to yourself holy crap I made that!
Now for the rough part, leveling. Your girl did not know what she was getting herself into when all of this happened. 2/10 recommend. But it got done + all is well.
Tip: get the ground wet before, maybe soak it early in the am or the night before to get it softer if you have ground like my...clay ground. I also dug the six holes for the wood posts that were meant to help secure this bed to the ground.

Fifth things fifth, ADD THE LINER, just do it. Don't question it or opt out of it. Measure and cut the liner so it goes up the walls of the bed too, this is to protect the wood from getting tooooo wet, weeds from growing underneath, + grass from growing in your bed.

Get good soil, it's not much of a price difference from the generic soil.

Sixth things sixth, (okay this is sounding so weird now lol) shovel or pour the soil in your bed. For reference, I used six bags of soil maybe seven for this garden bed. Water the soil twice to get it acclimated + to say hello soil you're about to do big things.

Annnnd, finallllly you can add your herbs, fruits, + veggies (12-18 inches apart for most but you can always double check that!

Thanks for coming to my Garden Talk, I hope ya'll loved watching the process + aren't annoyed of my DIY projects juuuust yet because I'm just getting started hehe.
Happy gardening!!!!
Leave a comment